A Professional ASP.NET Core - Middleware

Middleware is software that’s assembled into an app pipeline to handle requests and responses. Each component:

  • Chooses whether to pass the request to the next component in the pipeline.
  • Can perform work before and after the next component in the pipeline.

Request delegates are used to build the request pipeline. The request delegates handle each HTTP request.

Request delegates are configured using Run, Map, and Use extension methods. An individual request delegate can be specified in-line as an anonymous method (called in-line middleware), or it can be defined in a reusable class. These reusable classes and in-line anonymous methods are middleware, also called middleware components. Each middleware component in the request pipeline is responsible for invoking the next component in the pipeline or short-circuiting the pipeline. When a middleware short-circuits, it’s called a terminal middleware because it prevents further middleware from processing the request.

Create a middleware pipeline with IApplicationBuilder

The ASP.NET Core request pipeline consists of a sequence of request delegates, called one after the other. The following diagram demonstrates the concept. The thread of execution follows the black arrows.

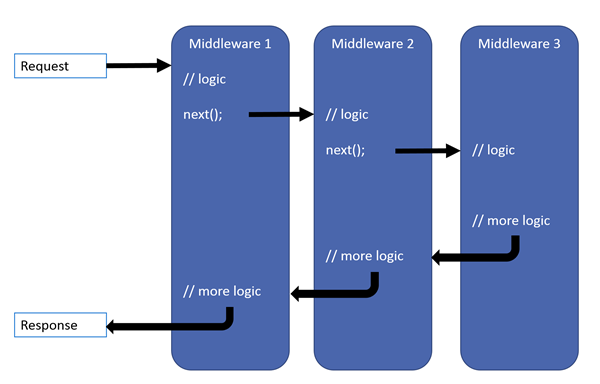
Each delegate can perform operations before and after the next delegate. Exception-handling delegates should be called early in the pipeline, so they can catch exceptions that occur in later stages of the pipeline.

The simplest possible ASP.NET Core app sets up a single request delegate that handles all requests. This case doesn’t include an actual request pipeline. Instead, a single anonymous function is called in response to every HTTP request.

1
2
3
4
5
6
7
8
9
10
11
public class Startup
{
public void Configure(IApplicationBuilder app)
{
// HERE
app.Run(async context =>
{
await context.Response.WriteAsync("Hello, World!");
});
}
}

Chain multiple request delegates together with Use. The next parameter represents the next delegate in the pipeline. You can short-circuit the pipeline by not calling the next parameter. You can typically perform actions both before and after the next delegate, as the following example demonstrates:

1
2
3
4
5
6
7
8
9
10
11
12
13
14
15
16
17
18
public class Startup
{
public void Configure(IApplicationBuilder app)
{
// HERE
app.Use(async (context, next) =>
{
// Do work that doesn't write to the Response.
await next.Invoke();
// Do logging or other work that doesn't write to the Response.
});

app.Run(async context =>
{
await context.Response.WriteAsync("Hello from 2nd delegate.");
});
}
}

When a delegate doesn’t pass a request to the next delegate, it’s called short-circuiting the request pipeline. Short-circuiting is often desirable because it avoids unnecessary work. For example, Static File Middleware can act as a terminal middleware by processing a request for a static file and short-circuiting the rest of the pipeline. Middleware added to the pipeline before the middleware that terminates further processing still processes code after their next.Invoke statements. However, see the following warning about attempting to write to a response that has already been sent.

Run delegates don’t receive a next parameter. The first Run delegate is always terminal and terminates the pipeline. Run is a convention. Some middleware components may expose Run[Middleware] methods that run at the end of the pipeline:

Middleware order

The following diagram shows the complete request processing pipeline for ASP.NET Core MVC and Razor Pages apps. You can see how, in a typical app, existing middlewares are ordered and where custom middlewares are added. You have full control over how to reorder existing middlewares or inject new custom middlewares as necessary for your scenarios.

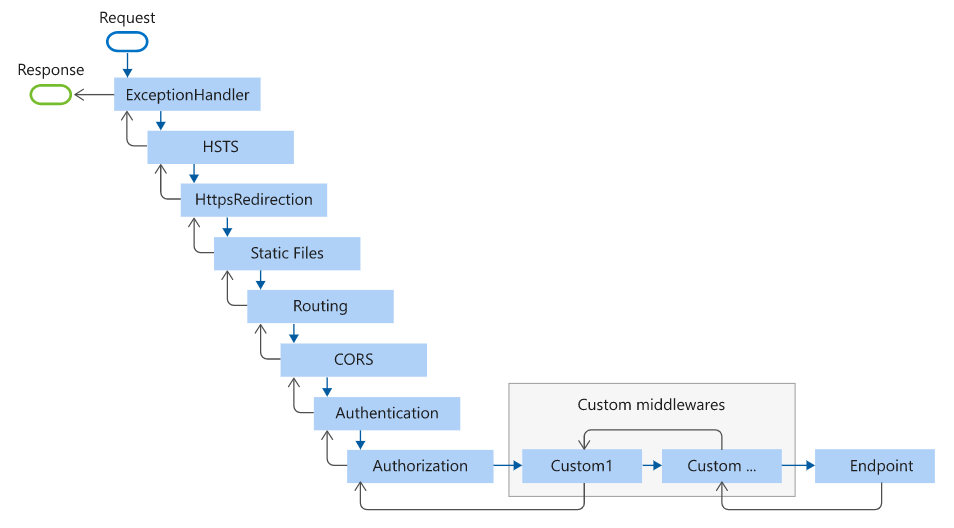
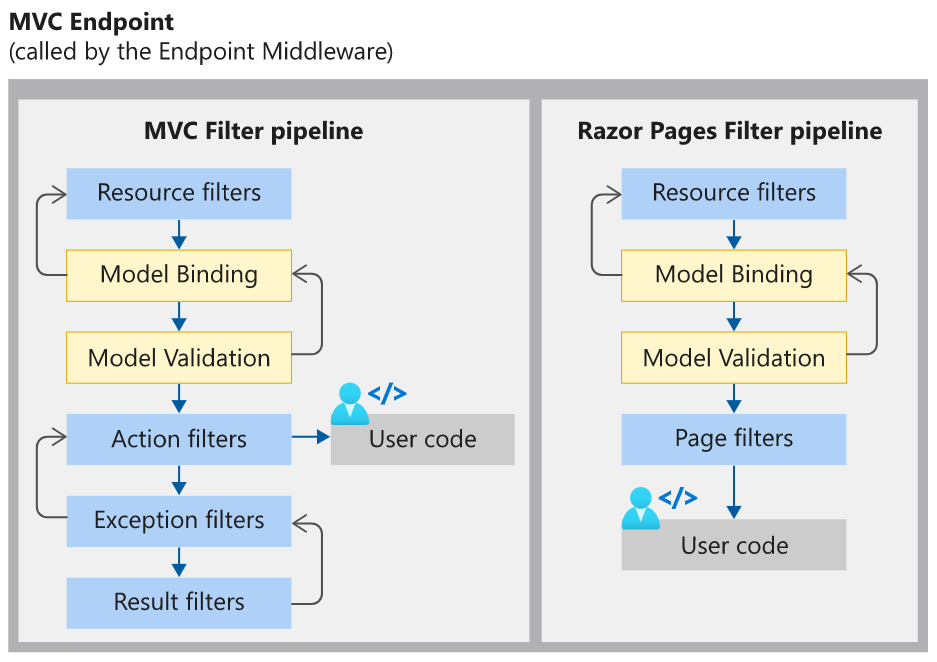
The Endpoint middleware in the preceding diagram executes the filter pipeline for the corresponding app type—MVC or Razor Pages.

Methods at a glance

Request delegates are configured using various extension methods as following:

Run

Terminates chain. No other middleware method will run after this. Should be placed at the end of any pipeline.

1
2
3
4
app.Run(async context =>
{
await context.Response.WriteAsync("Hello from " + _environment);
});

UseWhen

Performs action before and after next delegate if condition is met.

1
2
3
4
5
6
7
8
9
10
11
12
13
14
private static void HandleBranch(IApplicationBuilder app)
{
app.Run(async context =>
{
await context.Response.WriteAsync("Condition is fulfilled");
});
}

public void ConfigureUseWhen(IApplicationBuilder app)
{
app.UseWhen(context => {
return context.Request.Query.ContainsKey("somekey");
}, HandleBranch);
}

Use

Performs action before and after next delegate.

1
2
3
4
5
6
app.Use(async (context, next) =>
{
//action before next delegate
await next.Invoke(); //call next middleware
//action after called middleware
});

MapWhen

Enables branching pipeline. Runs specified middleware if condition is met.

1
2
3
4
5
6
7
8
9
10
11
12
13
14
private static void HandleBranch(IApplicationBuilder app)
{
app.Run(async context =>
{
await context.Response.WriteAsync("Condition is fulfilled");
});
}

public void ConfigureMapWhen(IApplicationBuilder app)
{
app.MapWhen(context => {
return context.Request.Query.ContainsKey("somekey");
}, HandleBranch);
}

Map

Similar to MapWhen. Runs middleware if path requested by user equals path provided in parameter.

1
2
3
4
5
6
7
8
9
10
11
12
13
private static void HandleMapTest(IApplicationBuilder app)
{
app.Run(async context =>
{
await context.Response.WriteAsync("Map Test Successful");
});
}

public void ConfigureMapping(IApplicationBuilder app)
{
app.Map("/maptest", HandleMapTest);

}

Common middlewares (in order)

The following is a list of common middlewares in order:

1
2
3
4
5
6
7
8
9
10
11
12
13
14
15
16
17
18
19
20
21
22
23
24
25
26
27
28
29
30
31
32
33
34
35
36
37
38
39
40
41
42
43
44
45
46
47
48
public void Configure(IApplicationBuilder app, IWebHostEnvironment env)
{
if (env.IsDevelopment())
{
// Displays detailed information about request exceptions.
app.UseDeveloperExceptionPage();
}
else
{
// Provide a path to the custom error page that will be displayed to the user.
app.UseExceptionHandler("/Home/Error");
// Send HTTP Strict Transport Security Protocol (HSTS) headers to clients.
app.UseHsts();
}
// Redirect HTTP requests to HTTPS.
app.UseHttpsRedirection();
// Enables static file serving for the current request path.
app.UseStaticFiles();
// Enables cookie policy capabilities.
app.UseCookiePolicy();
// Enables dynamically compressing HTTP Responses.
app.UseResponseCompression();

// Matches request to an endpoint.
app.UseRouting();
// Set culture information for requests based on information provided by the client.
app.UseRequestLocalization();
// Applies a CORS policy to all the app's endpoints with the specified origins.
app.UseCors();

// Authentication is concerned with determining 'who' made a request.
app.UseAuthentication();
// Authorization is concerned with 'what' a user is allowed to access.
app.UseAuthorization();

// Enable session state for the application.
app.UseSession();
// Determines when responses are cacheable, stores responses, and serves responses from cache.
app.UseResponseCaching();

// Execute the matched endpoint.
app.UseEndpoints(endpoints =>
{
endpoints.MapControllerRoute(
name: "default",
pattern: "{controller=Home}/{action=Index}/{id?}");
});
}

Componentising custom middleware

In some scenarios you might want to write a custom middleware.

Write below classes:

1
2
3
4
5
6
7
8
9
10
11
12
13
14
15
16
17
18
19
20
21
22
23
24
25
26
27
public class CustomMiddleware
{
// A function that can process an HTTP request.
private readonly RequestDelegate _next;

public CustomMiddleware(RequestDelegate next)
{
_next = next;
}
public Task Invoke(HttpContext httpContext)
{
await context.Response.WriteAsync("------- Before ------ \n\r");

// Call the next delegate/middleware in the pipeline.
return _next(httpContext);

await context.Response.WriteAsync("\n\r------- After ------");
}
}

public static class CustomMiddlewareExtensions
{
public static IApplicationBuilder UseCustomMiddleware(this IApplicationBuilder builder)
{
return builder.UseMiddleware<CustomMiddleware>();
}
}

The middleware class must include:

  • A public constructor with a parameter of type RequestDelegate.
  • A public method named Invoke or InvokeAsync. This method must:
    • Return a Task.
    • Accept a first parameter of type HttpContext.

Additional parameters for the constructor and Invoke or InvokeAsync are populated by dependency injection (DI).

Now, use it as following:

1
2
3
4
5
6
7
8
9
10
11
12
13
14
15
// Startup.cs

public class Startup
{
public void Configure(IApplicationBuilder app)
{
// HERE
app.UseCustomMiddleware();

app.Run(async (context) =>
{
await context.Response.WriteAsync("Hello World!");
});
}
}

Adding custom options to middleware

Writing a custom middleware is great but you will come to a point where it needs to be made configurable.

Let’s define a configuration options class which defines some options which the middleware can use.

1
2
3
4
5
public class CustomMiddlewareOptions
{
public bool DisplayBefore { get; set; } = true;
public bool DisplayAfter { get; set; } = true;
}

Write extension methods to get options with Action<CustomMiddlewareOptions> as following:

1
2
3
4
5
6
7
8
9
10
11
12
13
14
15
public static class CustomMiddlewareWithOptionsExtensions
{
public static IServiceCollection AddCustomMiddlewareWithOptions(this IServiceCollection service, Action<CustomMiddlewareOptions> options = default /* HERE */)
{
options = options ?? (opts => { });

service.Configure(options);
return service;
}

public static IApplicationBuilder UseCustomMiddlewareWithOptions(this IApplicationBuilder builder)
{
return builder.UseMiddleware<CustomMiddlewareWithOptions>();
}
}

The middleware now can be added into the pipeline and be setup using a lambda expression. It can take the Options in through constructor through the DI mechanism. It comes from the IOptions<T> functionality.

1
2
3
4
5
6
7
8
9
10
11
12
13
14
15
16
17
18
19
20
21
22
23
24
25
26
27
28
using Microsoft.Extensions.Options;

public class CustomMiddlewareWithOptions
{
private readonly RequestDelegate _next;
private readonly CustomMiddlewareOptions _options;

public CustomMiddlewareWithOptions(RequestDelegate next, IOptions<CustomMiddlewareOptions> options /* HERE */)
{
_next = next;
_options = options.Value;
}

public async Task InvokeAsync(HttpContext context)
{
if (_options.DisplayBefore)
{
await context.Response.WriteAsync("------- Before ------ \n\r");
}

await _next(context);

if (_options.DisplayAfter)
{
await context.Response.WriteAsync("\n\r------- After ------");
}
}
}

Register and config it as below:

1
2
3
4
5
6
7
8
9
10
11
12
13
14
15
16
17
public class Startup
{
public void ConfigureServices(IServiceCollection services)
{
services.AddCustomMiddlewareWithOptions(options => options.DisplayAfter = false);
}

public void Configure(IApplicationBuilder app)
{
app.UseCustomMiddlewareWithOptions();

app.Run(async (context) =>
{
await context.Response.WriteAsync("Hello World!");
});
}
}

Multiple configuration setup

The other option is the multiple configuration setup option where you want to be able to use the same type of middleware more than once in your application pipeline but want to specify configuration per usage. For this option you specify that you require a configuration option instance directly and it’s not hidden behind IOptions<>.

1
2
3
4
5
6
7
8
9
10
11
12
13
14
15
16
17
18
19
20
21
22
23
24
25
26
public class CustomMiddlewareWithOptionsMultiUse
{
private readonly RequestDelegate _next;
private readonly CustomMiddlewareOptions _options;

public CustomMiddlewareWithOptionsMultiUse(RequestDelegate next, CustomMiddlewareOptions options)
{
_next = next;
_options = options;
}

public async Task InvokeAsync(HttpContext context)
{
if (_options.DisplayBefore)
{
await context.Response.WriteAsync("------- Before ------ \n\r");
}

await _next(context);

if (_options.DisplayAfter)
{
await context.Response.WriteAsync("\n\r------- After ------");
}
}
}

Adding this version into the middleware pipeline is much straight forward however using an extension method makes it cleaner from a consumers point of view.

1
2
3
4
5
6
7
8
public static class CustomMiddlewareWithOptionsMultiUseExtensions
{
public static IApplicationBuilder UseCustomMiddlewareWithOptionsMultiUse(this IApplicationBuilder builder, CustomMiddlewareOptions options = default)
{
options = options ?? new CustomMiddlewareOptions();
return builder.UseMiddleware<CustomMiddlewareWithOptionsMultiUse>(options);
}
}

Passing in the options instance into the UseMiddleware method call allows for the DI system inject it into the middleware constructor directly.

Using this extension method we can then add in multiple instances into the pipeline with different configuration options specified.

1
2
3
4
5
6
7
8
9
10
11
12
13
public class Startup
{
public void Configure(IApplicationBuilder app, IHostingEnvironment env)
{
app.UseCustomMiddlewareWithOptionsMultiUse(new CustomMiddlewareOptions { DisplayBefore = true });
app.UseCustomMiddlewareWithOptionsMultiUse(new CustomMiddlewareOptions { DisplayAfter = false });

app.Run(async (context) =>
{
await context.Response.WriteAsync("Hello World!");
});
}
}

Reference(s)

Most of the information in this article has gathered from various references.